Get the Look: Home Edition
Sitting home scavenging the house for something to do is extremely painful. You know you have made it to the depths of your boredom when you are just wandering around your house.
One of the greatest cures to boredom is learning how to do something new. It saves you from staring at the ceiling but it also makes you productive, it's essentially a win-win.
Fortunately for you, we understand boredom and want to be your cure! We have curated some easy hairstyles you can master at home.
Maybe you can end up being a master hairstylist by challenging yourself to try all the styles we suggest or maybe you will just add a cute new date night style to your arsenal.
Whatever the case, here is some hairspiration to cure boredom blues. All you need is some will, imagination, and of course, some time to kill.
CHALLENGE YOURSELF
Bubble Ponytail

Regular ponytails lack the imagination you need right now. Transform it by trying a bubble ponytail. It is a simple look that still makes it look like you tried.
Here is how you create the Bubble Ponytail:
Step One: Pull up half of your hair and secure it with a clear elastic.
Step Two: Take a section of your hair in the half-up ponytail and wrap it around the clear elastic. Then tuck your hair into the clear elastic (where you can’t see it). This is so you can hide the elastic and give the illusion your hair can act as a ponytail holder.
Step Three: Tease the ponytail. To give it that “bubble” look you want your ponytail to have plenty of volume.
Step Four: Repeat the first three steps until you get to the end of your hair. Tug and loosen the bubbles as you go to give it more volume.
Step Five: Tug all your bubbles to loosen them and give them personality. Try to keep all of the bubbles about the same size and keep the overall look slightly messy. And don’t forget to spray some hairspray to keep everything in place.
Space Buns

This style is perfect for when your hair just doesn't want to cooperate with you or if you just want a cute switch up in your routine. Space buns are great to do in between washes because you need your hair to be a bit textured.
But here’s how you do perfect Space Buns:
Step One: Separate your hair into two sections, leaving some front pieces out.
Step Two: Brush each section into a messy bun on top of your head then secure the bun with some bobby pins.
Step Three: Repeat step two for the other bun.
Step Four: Finish the style with some hairspray.
Bow Hairstyle

Wrap your hair with perfection with this cute bow hairstyle. A simple look that will have you looking like a gift from the hair gods.
Try this Bow Hairstyle:
Step One: Pull your hair up to the top of your head. When you pull it up make sure you flip the ends of your hair forward and then grab your hair, creating a little bubble. Then wrap a hair tie around the base of the folder hair to keep it in place.
Step Two: Separate your bubble-bun down the middle to create the bow’s sides.
Step Three: Grab the ends of your hair and wrap them towards the back of your head over the center of the parted sides. This piece of hair creates the center part of a bow and ties the look together.
Step Four: Pin your bow into place by using a few bobby pins.
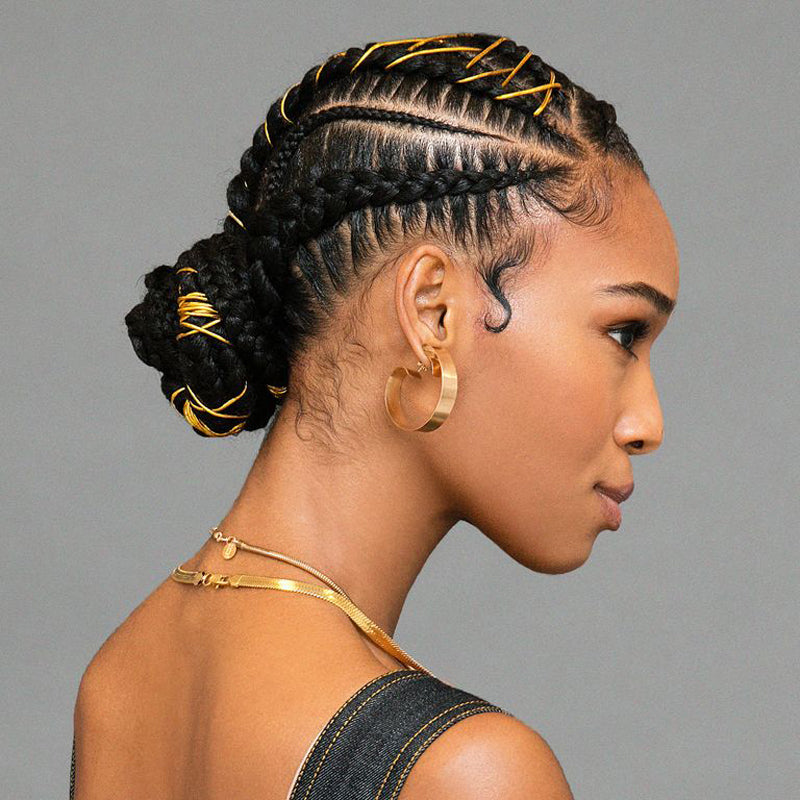
Golden Braided Bun

This is a style for the skilled braiders who enjoy a challenge or even for the confident beginner.
Try this Golden Braided Bun that adds a little golden style to your hairstyle arsenal:
Step One: Make a deep part on the right side of your head and then create four triangle sections with a comb. You are going to end up with four large braids and smaller ones in between when you finish.
Step Two: Cornrow two small sections of hair alongside the right side of the part toward the nape of the neck.
Step Three: Create another small braid along the part by cornrowing it downward at an angle. The third cornrow, which is larger, should start on the right side and curve across the top of your head.
Step Four: Now you are going to do a thicker braid along your hairline. Continue braiding it past your ear, all the way to your ends.
Step Five: Create a thicker braid alongside the braid you made in step three on the left, and then another one next to the part you initially made on the right side.
Step Six: The last braid should also be a thicker one on the right-hand side of your head; braid it all the way to the ends.
Step Seven: Finally it is time to weave in the gold cording. Use a crochet needle and feed the cord into your braids whatever way you would like. Wrap the cord around two braids, joining them together. Then, wrap the other braids hanging down around to create themselves to create the base of the bun. Lastly, wrap the gilded ends hanging down around and secure it into place with a hair needle and thread.
Step Eight: Lay your edges, and then apply mousse, wrap your braids, and hit it with heat to set the style.
If you need more of a visual here is a video:
Milkmaid Braid

This look gives you the look of a braided headband. If you can do a simple fishtail braid then you can nail this look.
Give the Milkmaid Braid a try:
Step One: Create a side part, don’t worry it doesn’t have to be perfect.
Step Two: Give yourself some pigtails. Leave a tiny sliver of hair out on each side and secure each ponytail with an elastic.
Step Three: Wrap the sliver of hair around your hair tie to hide it and secure it using bobby pins.
Step Four: Separate your pigtail into two sections to prep for the fishtail braid.
Step Five: Weave a fishtail braid.
Step Six: Secure the braid with an elastic, so it doesn't unravel. Gently pull the braid to give it some more volume.
Step Seven: Wrap the braids across the top of your head and bobby pin it into place at the base.
Step Eight: Repeat the last step on the left side.
Step Nine: Finish with a little hairspray.
Salon Blowout At Home
To get a salon blowout at home without the hair damage try using the RevAir Reverse-Air Dryer. You can salon results in half the time and without frying your hair. It is super simple!
Here’s how you do it with the RevAir:
Need more tutorials? Check out our Youtube Channel where we have the exclusive RevAir tips and tricks.
USE ACCESSORIES
These are some fun looks that use accessories to their advantage. What’s cool about accessories is that they can be whatever you want, just as long as it adds a little umph to your style. Check out these tutorials to see people using pins, ribbon, string, and more. Just think about the kind of household items you could use that could add some style to your next hairdo.
TRY IT AND SHARE IT
We hope this list of hair tutorials and styles to try gives you something to do next time you are bored or if you are simply looking for a new look.
If you try out any of these styles and care to share, make sure you tag us @myrevair and use the hashtag #myrevair, we would love to see your hair masterpieces.


